How to do SSL File Transfers on JSCAPE MFT Server
SSL is a protocol for encrypting information sent over a network. Learn how to set up an SSL services and perform secure file transfers on JSCAPE MFT Server.

Overview
In one of my previous posts, I defined what an SSL file transfer is. Today, I'm going to show you how to actually set up an SSL file transfer service on JSCAPE MFT Server. After that, I'll demonstrate how an AnyClient user would connect to your server and perform a secure file transfer using that particular service.

SSL File Transfer could mean a file transfer carried out over either HTTPS or FTPS. For this post, we're going to focus on the latter, so we'll be shuffling between the terms FTPS and SSL File Transfer throughout the article. Let's go over to the server side and start setting things up there.
Want to learn how to set up HTTPS file transfers instead? Click that link then.
Preparing the keys needed for encryption
In order to provide SSL encryption and authentication capabilities to your file transfers, you need to generate server keys first. When you generate server keys, you are also, in effect, generating the public keys needed for encrypting the files and the private keys for the digital certificates needed by clients to authenticate the server.
Launch your JSCAPE MFT Server Manager and go to the Keys menu.

Navigate to the Server Keys tab and click the Generate > Generate Key button.

Select/enter the appropriate values for the required settings. You can get basic information on what values to assign to those settings from our documentation about generating a key But in addition to that, there are a couple of things I'd like to point out.
In case you're wondering how the Key Alias differs from the Common Name (CN), the alias is only referenced within the context of JSCAPE MFT Server administration. Only you, the server admin, will have any use of it. The CN, on the other hand, can be seen by a user when that user's file client application receives your server's digital certificate.
Another setting you might want to know more about is the key algorithm. If you want to know which key algorithm (RSA or DSA) will work best for your particular setup, I recommend you read the blog post Which Works Best for Encrypted File Transfers - RSA or DSA?
When you're done with all those settings, click the OK button found at the bottom.

You should then see your newly created key among the list of server keys. Click OK.

You're now ready to add an FTPS service to your server.
Adding an SSL File Transfer service
Navigate to the Services node, go the Services tab, and click the Add button.

Select FTP/S for the Service Protocol.

In the succeeding screen, enter your host's IP address, and then enter the port associated with this service. Depending on the FTPS type you choose, which you'll be doing in the next step, that should be either port 21 or port 990. Yes, 21 is the same port you normally use to connect to an FTP server. Don't worry. Your server will know if a client's connecting over FTP or FTPS.
Choose an FTPS type. The options are: Explicit SSL, Forced Explicit SSL, and Implicit SSL. For guidance in choosing Between SSL Implicit, Explicit, and Forced Explicit modes, click that link.
Finally, click the alias of the server key you recently created. You can of course choose any other existing server key found on that list. By selecting a key from that list, you're instructing the server which private key it should use for the digital certificates it sends to users who connect to this particular service.
Consequently, you're also telling the managed file transfer server which public keys should be sent along with the digital certificate. The public key will be used in providing encryption to the secure file transfer session.
Click OK when you're done.

You should then see your newly added FTPS service in the list of services offered by your JSCAPE MFT Server.

Now that you have your SSL file transfer service up and running, you can now give it a test run.
Carrying out a secure file transfer using FTPS
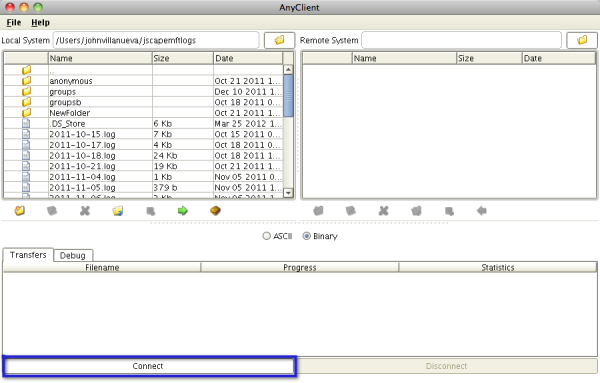
Fire up AnyClient and click the Connect button.

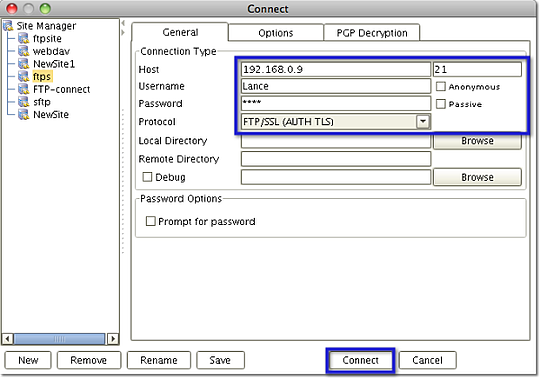
Create a new Site and enter the Host IP address and port number. Also enter the username and password of one of your server's user accounts. Finally, select FTP/SSL (AUTH TLS) from the Protocol list box.
Recommended read: TLS vs SSL - Know The Difference
When you're ready, click the Connect button.

Assuming everything goes well, you'll receive a digital certificate which you can use for authenticating the server. That is, if you were an actual end user, you would normally check to see if the contents of that certificate are equivalent to the contents of the certificate normally issued by the server you wanted to connect to. If the contents are exactly as expected, then that means a connection was really established with the legitimate server and not an impostor.
Note that the certificate your user will be seeing at this point is only a self-signed certificate. Self-signed certificates are only good for internal use. For external use or for file transfers that require higher levels of security, you should employ certificates signed by duly recognized certificate authorities. If you're not familiar with digital certificates, I suggest you read the post What Is A Digital Certificate?.

Click Accept or Accept and Save. Accept and Save is what you should choose if you don't want to be prompted again every time you connect to the same service on that same server in the future.
That's it. You will then be able to upload and download files securely.
SSL File Transfer Summary
Taking into account all the relevant links I've included here, this article provides a comprehensive reference for configuring an FTPS server as well as for actually carrying out SSL file transfers with that server.
Get Started
Download the free, fully-functional Starter Edition of JSCAPE MFT Server
Download the always free AnyClient. Download Now